![Let’s Get into the Weeds: Fly Lines Part 3](http://montanacastingco.com/cdn/shop/articles/fly-line-fly-fishing-reel-and-dog.webp?v=1715274210)
Let’s Get into the Weeds: Fly Lines Part 3
By: Montana Casting Co.
Our fly line series so far...
If you’ve kept up with the previous two posts on fly lines, then you’ve slogged through a lot of information on fly line weight, taper, and general physics. Congratulations! You’ve graduated. I hope we’ve managed to beat back some of the mystery surrounding modern fly line specifications. At the very least, you’ve got a few facts in your back pocket to school your buddies with on the river.
If you haven’t kept up, no worries. Regardless of your familiarity with the Common Cents System (see Part 1) or the parts of a taper (see Part 2), Part 3 is meant to be a quick, user-friendly guide to Montana Casting Co. fly lines. Which line is best for you? Read on and find out.
The lowdown on Montana Casting Co. fly lines:
Montana Casting Company is rooted in the traditions of custom rod building. When we decided to expand from those roots, we decided to design our rods, reels, and fly lines in tandem so that each component could maximize the performance of the other. With a selection of three different fly lines in our store, you’re free to customize your line to fit your rod and the environment you plan to fish in.
Just to be clear, our fly rods can be used with any brand of fly line. If you have a tried-and-true brand that you fall back on, use it. Our rods will cast it with ease and accuracy. That said, we’ve put a considerable amount of thought into designing three fly lines that we believe will maximize the performance of your fly rod and we encourage you to give them a try. Here’s a simple rundown of what to look for when choosing a Montana Casting Co. fly line.
What do the names of MCCo. fly lines tell you?
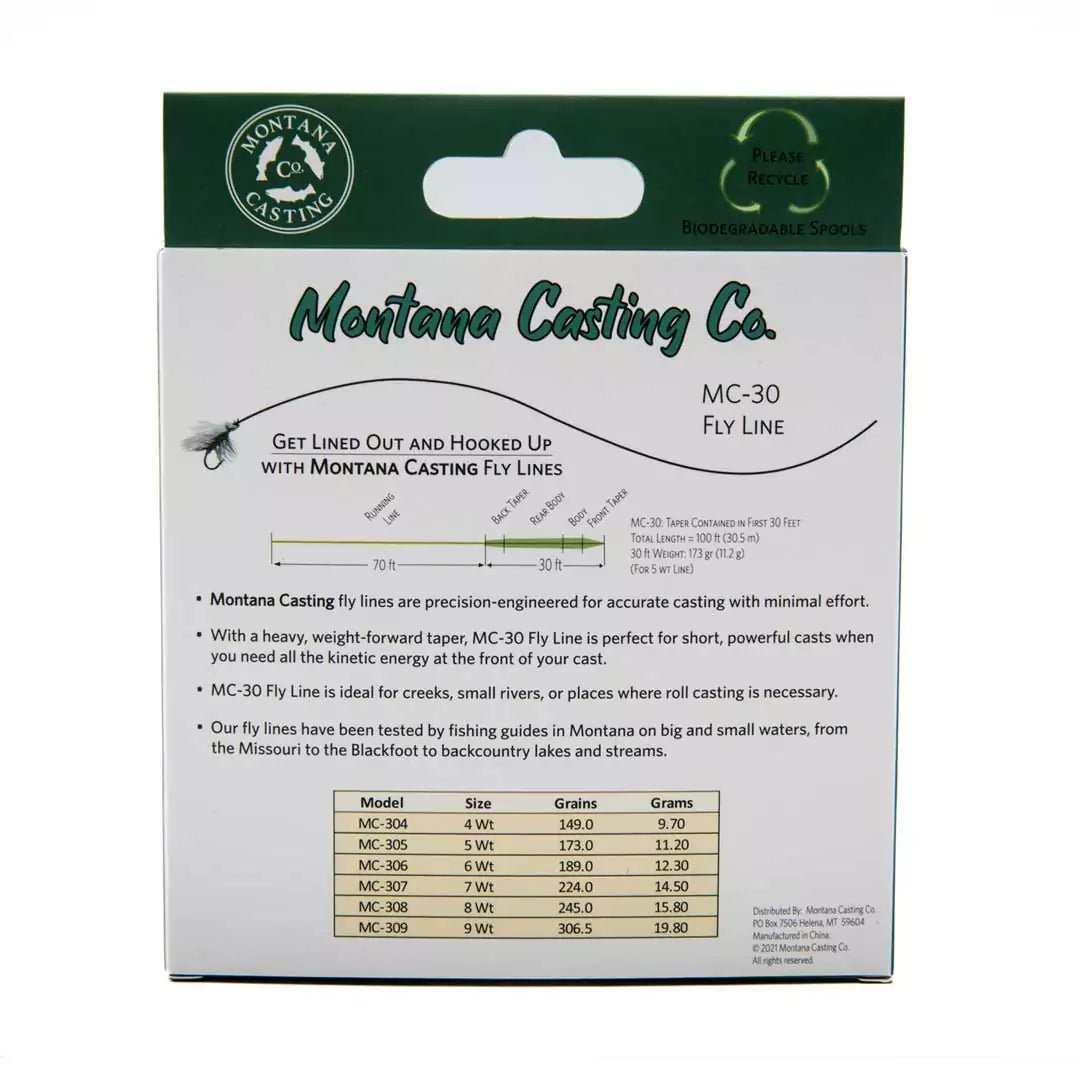
You can choose between the MC-30, MC-38, and MC-40 fly line. Your first hint at the difference between these lines is in the name. MC-30, for instance, indicates that the tapered head of the fly line is in the first 30 feet. Additionally, there will be a number following the name of the general model to specify line weight; MC-306 refers to a 6 wt MC-30 line. As stated earlier, you’ll generally want to match the line weight to the weight of your fly rod.
When should I use the MC-30 fly line?
The tapered head of this fly line is in the first 30 feet, making this an aggressive weight-forward line. If your current fly rod is fast action and you're having trouble loading the rod, try this line; you’ll really feel the difference. This is also a great line for times when you’ll be consistently making short casts of 30 feet or less. It’s a blast to cast!
![MC-30 Fly Line Packaging with Specifications](https://cdn.shopify.com/s/files/1/0623/8168/6997/files/MC-30-fly-line-packaging-with-specifications_480x480.webp?v=1715087714)
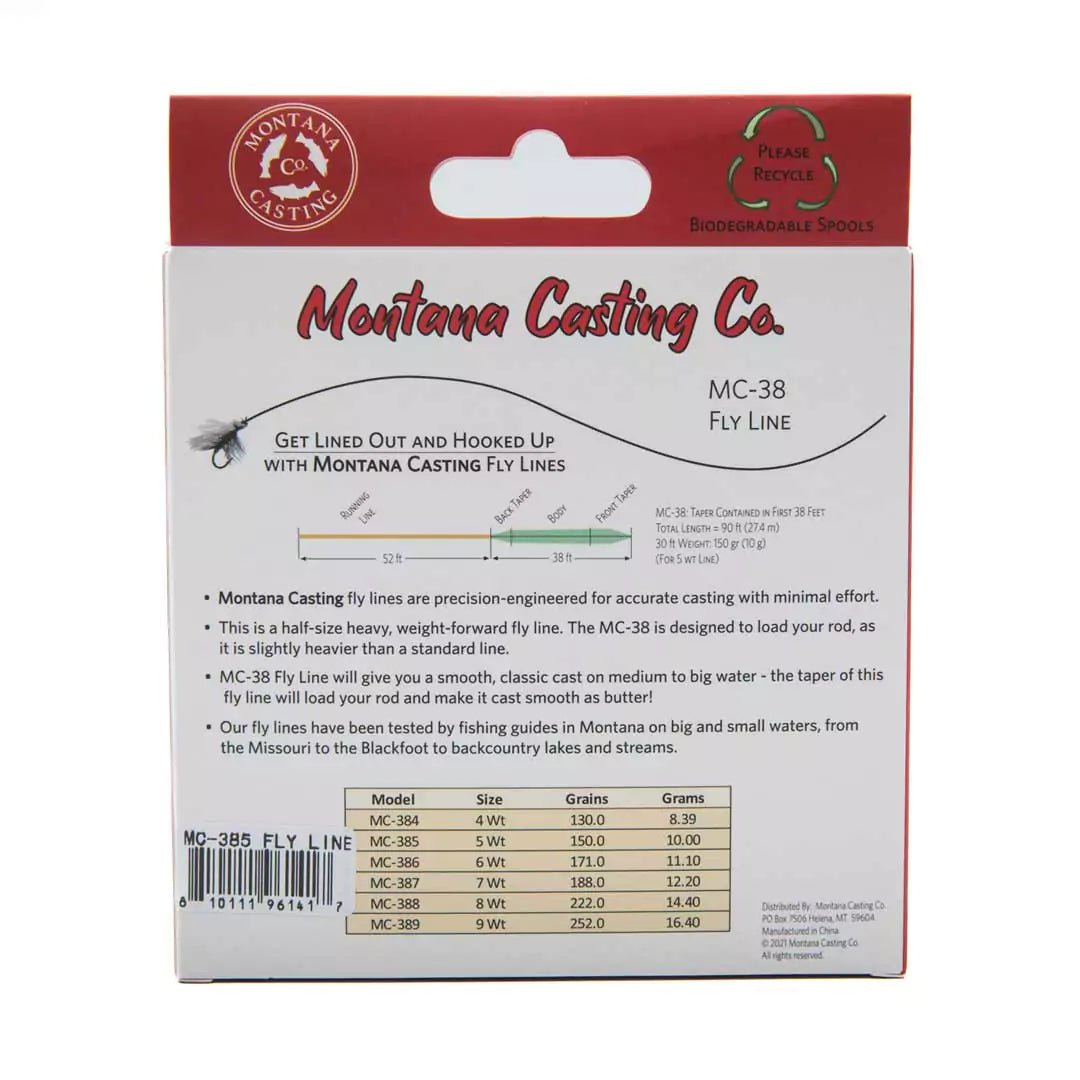
When should I use the MC-38 fly line?
The tapered head of this fly line is in the first 38 feet. That extra 8 ft adds 30 grain to your standard fly line and serves as a happy medium between more aggressive weight forward lines and lengthier tapers meant for long casts. This is a great line for your day-in and day-out fishing trips, and it will work in any condition. (It pairs especially well with the smooth, medium action of the Craig Fly Rod!)
![MC-38 Fly Line Packaging Showing Specifications](https://cdn.shopify.com/s/files/1/0623/8168/6997/files/MC-38-fly-line-packaging-information_480x480.webp?v=1715087144)
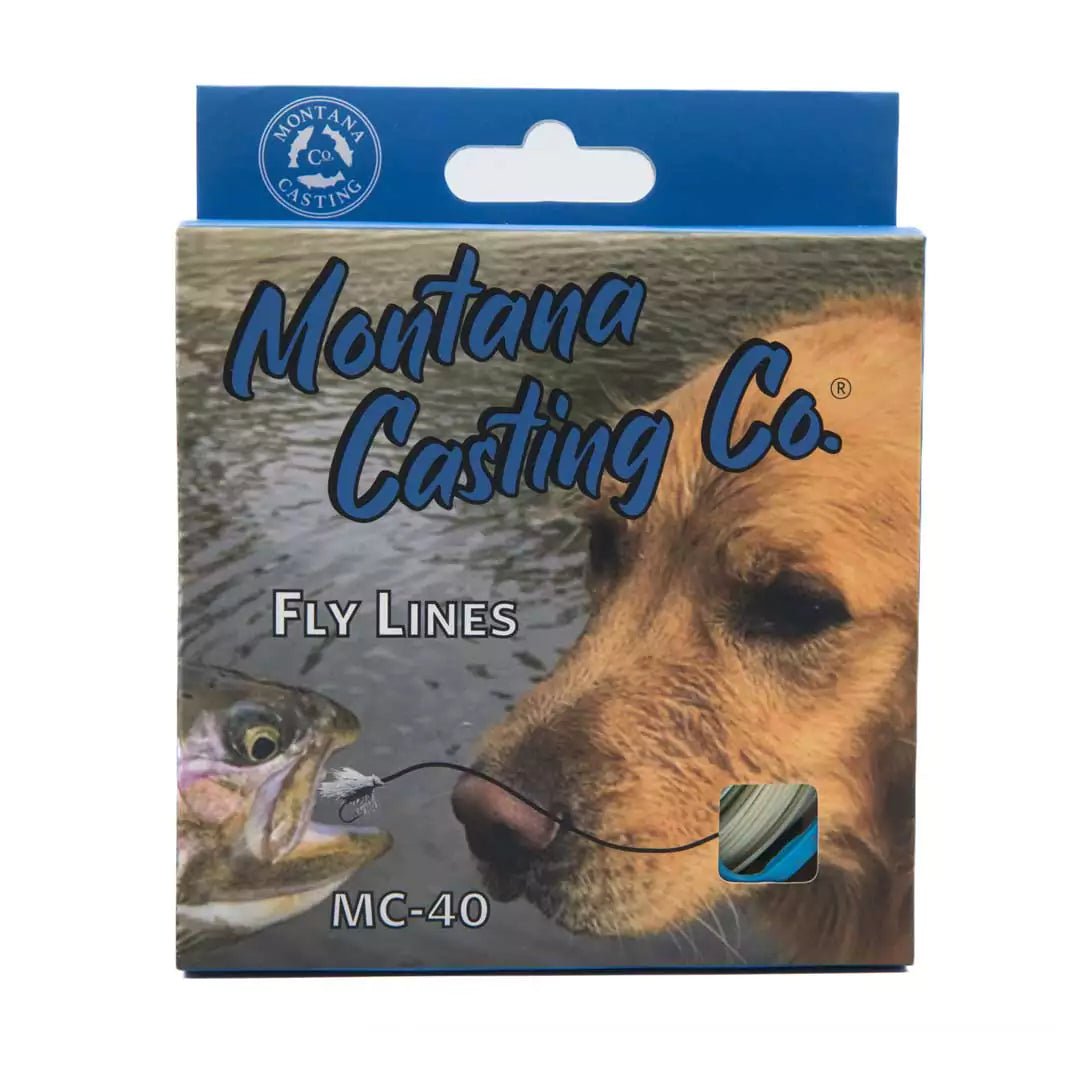
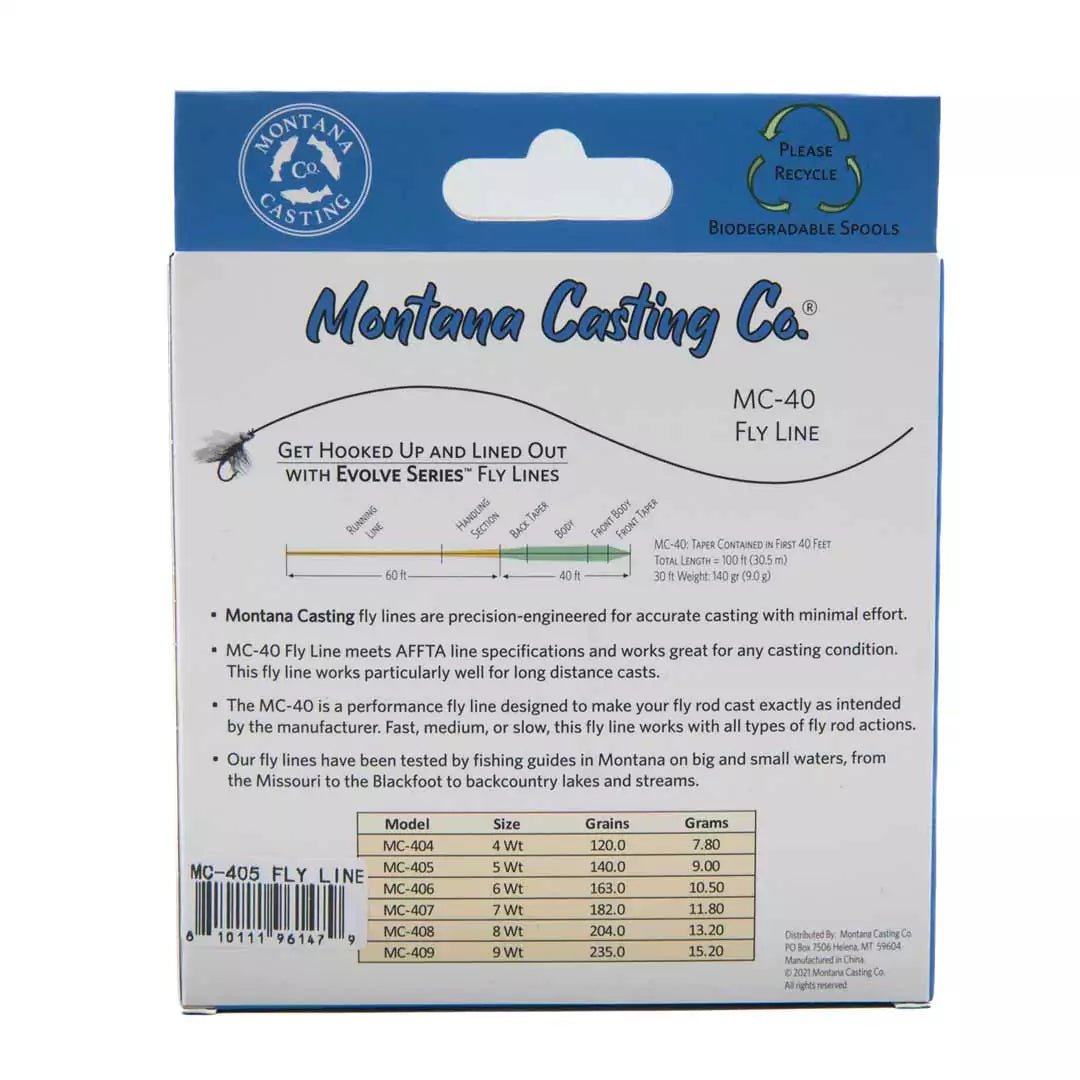
When should I use the MC-40 fly line?
The tapered head of this fly line is in the first 40 feet. This line fits the AFFTA standards, meaning that it is a standard taper line. Though it works well in all conditions, this line is perfect for long casts with dries to a skittish hog brown or the like. Gentle presentations are key, and the MC-40 is the right fly line for the job.
![MC-40 Fly Line Packaging with Specifications](https://cdn.shopify.com/s/files/1/0623/8168/6997/files/MC-40-fly-line-packaging-with-specifications_480x480.webp?v=1715087437)
Get out of the weeds and get fishing!
The question of which fly line is right for you can be a complicated one to answer. We’ve mercilessly dissected many fly lines over the years in the name of science… As a result, we’ve gotten our fly rods and fly lines to be exactly what we want them to be. That said, fly fishing is a sport of continuous learning and growth. So get out there, have fun, and experiment!
Have questions? Want to talk shop? We’re always happy to chat. Leave a comment below, send us an email at gethookedup@montanacastingco.com, or give us a call at 406-285-1452. Happy fishing!
Some Products Featured in this Article
-
MC-30
$69.00
Fly Line -
MC-38
$69.00
Fly Line -
MC-40
$69.00
Fly Line
Recommended Reading
-
What’s a nail knot and when is it used?
Many modern fly lines are designed with welded loops, allowing for leader to be attached quickly loop-to-loop. Prior to the invention of welded loop fly lines, however, nail knots were commonly used to attach a butt section of monofilament to the fly line. The leader would then be tied to the butt section, rather than directly to the fly line to extend the life of the fly line.
Loop-to-loop is certainly simpler, but some fly fishermen still prefer using a nail knot and a butt section. In our opinion, this method better transfers the energy from the fly line to the fly by turning the leader over more efficiently.
Tying a nail knot:
A nail knot is one of the more complicated knots to tie. For this reason, we always use a Tie-Fast Tool—an ingenious tool that makes tying a nail knot simple. Here’s how to use it:
- Place your butt section in the notch of the tool, leaving about 6 inches sticking out of the front (or tip) of the tool.
- Hold the butt section in place with your thumb. Wrap the end of the butt section around the tip of the Tie-Fast, working up the tool toward your thumb.
- After 6 or 7 wraps, run the tag end of the butt section through the coils and back out the tip of the tool.
- Continue to pinch everything in place and run the end of your fly line from the tip of the tool, through the coils, and back to your thumb. Pinch the fly line along with the butt section against the tool.
- With a quick pull of the short end of the butt section, the coils will jump off of the tool and wrap around the fly line.
- Adjust the coils to be straight before pulling both ends of the butt section to cinch the knot down.
- Trim the tag ends of the fly line and butt section.
- Blood knot your leader to the butt section… and go fishing!
Need a visual? Follow along in the video below as Montana Casting Company founder and rod-building wizard Scott Joyner walks through the steps of tying a nail knot. Happy fishing!
Fly Fishing Knots: How to Tie a Nail Knot
-
Fly Fishing Adventure in the High Country
Nothing says summer like hiking to a high mountain lake with your fly rod strapped to your backpack! From day hikes to backpacking trips, there’s endless opportunity for adventuring in the rugged peaks, cool breezes, and solitude of the high country. We spend a lot of time exploring mountain lakes during the summer and they’ve long been one of our favorite places to fly fish.
Backpacking with the fly rod.While some mountain lakes are more remote than others, hiking into any of these gorgeous locations means you’ll need to be extra prepared. Here’s what we like to have with us for a fun and successful day in the mountains.
Don’t forget your basic outdoor gear:
There are a few essentials that everyone should carry with them, regardless of why they’re hiking in the backcountry. In your backpack, you’ll want to make sure you have a first aid kit, a lighter, a water filter and water, headlamp, sun protection (sun glasses, sunscreen, AND cap), a navigational aid (GPS and/or physical map), a pocket knife/Leatherman, plenty of food, and extra layers. If you’re backpacking, you’ll want some sort of bivy sack or tent to ward off the elements… And even if you’re not backpacking, having some sort of quick and easy shelter on hand is never a bad idea.
Example gear for a longer backpacking trip.We also highly recommend bringing bear spray, especially when hiking in Montana, Idaho, or Wyoming. Take a moment to familiarize yourself with the wildlife in the area and review best practices for wildlife encounters.
Fly fishing gear to have on hand:
Waders. Yes, waders. More often than not, even though it's a hot day, the water temps in high mountain lakes will freeze you to the bone in no time at all without them. And if you’re bringing waders, wading shoes are also an essential to keep your waders hole-free. To keep things light, we like to bring sandals or an old pair of light-weight running sneakers.
Warm clothes. We already mentioned layers above, but it’s worth restating: warm clothes are a must. Unpredictable weather aside, being in the water for long periods of time (even on a perfectly sunny day) will require a good coat and even some long underwear beneath your waders.
Fly rod. You’ll want a 4-piece rod for ease of carrying in your backpack. We like the Craig Fly Rod for these trips because it's light and tough. You’ll also want a light, strong and dependable fly reel like our Lite 406 Reel. You don’t want to hike into a mountain lake just to find out your fly reel is not functioning properly, so make sure you have good gear!
Getting the Craig Fly Rod ready for some backcountry fishing.Tippet and leaders. We like a 7.5 ft 5X leader with 5X or 6X tippet, depending on the size of fish you expect to be catching.
Flies. This will obviously vary based on the type of fly fishing you’re hoping to do. For dries, Parachute Adams, Madam X, and Royal Trude will generally get the job done. For nymphs, Lighting Bugs, Copper Johns, Scuds, Pheasant Tails, and Hot Head bead flies will keep you jumping. Bring some smaller streamers along as well (like Wooly Buggers).
The miscellaneous. Fly floatant, non-toxic sinkers, and a small fly box or fly puck should all be in your kit. If you're packing a float tube and fins along, you might want to bring a sinking line or a detachable sink tip. Getting a streamer down deep and paddling backward slowly is a great technique for larger fish.
Now there’s just one thing left to do: pack up your gear and hit the trails. Those high-country cutthroat and grayling are calling! (Psst… Send us pictures and stories of your adventures; we'd love to see them!)
Have a question? Been to some mountain lakes recently? Tell us about it in the comments below!
Our Kit Series: Fly Fishing Mountain Lakes
-
NOTE: If you're looking for the "Our Kit Series" blog, please click here: Fly Fishing Mountain Lakes. Otherwise, read on to learn about the two different Surgeon's knots:
Not the Same Knot
While both of these common fly fishing knots utilize the same basic principle, there are slight variations in how they are tied and what they are used for. We’ve broken both down below into a simple step-by-step how-to.
When to Use a Surgeon’s Loop
This simple knot is used to create a strong loop in the end of your leader or tippet to allow for loop-to-loop connection between tippet and leader or leader and the welded loop of your fly line. Read on for step-by-step instructions!
Tying a Surgeon’s Loop
- Double the end of your leader or tippet over on itself.
- Make a loop with the doubled line.
- Draw the end of the doubled line through the loop twice.
- Wet the knot and cinch it down.
When to Use a Double Overhand Surgeon’s Knot
This is one of the most commonly used knots in fly fishing. Simple and strong, this is an efficient way to attach tippet to leader and tippet to tippet. It’s also great for fishing with a dropper; you can leave a tag end and tie on a fly for a more natural presentation. Though there are other knots that allow you to achieve similar results, the simplicity and speed with which a double-overhand surgeon’s knot can be tied makes it a fly fishing mainstay. Read on for step-by-step instructions and a helpful how-to video!
Tying a Double Overhand Surgeon’s Knot
- Place the two ends of tippet (or leader and tippet) side-by-side, pointing in opposite directions.
- Make a large overhand loop in the center of the overlapping ends.
- Now, simply pull one side of the tippet ends through the loop twice.
- Wet the knot with some spit or water and cinch it down.
- Trim off the tag ends or leave one long to tie on a dropper.
Drop your questions or requests for future instructional blogs in the comments below. Happy fishing!
Fly Fishing Knots: Surgeon’s Loop and Double Overhand Surgeon’s Knot
-
The Madison River begins at the confluence of the Gibbon and Firehole Rivers in Yellowstone and flows through approximately 183 miles of mountain-framed vistas before arriving at Three Forks—a meeting of the Jefferson, Gallatin, and Madison Rivers that marks the headwaters of the Missouri River.
The Upper Madison, stretching from Quake Lake to Ennis, is open to fishing year-round. A smaller section from Reynolds Pass Bridge to Lyons Bridge is wade-only fishing; you can float this section, but you can’t fish from the boat. Whether wading or floating, the Upper Madison offers boundless opportunities for wrangling large trout and taking in the rugged beauty that western Montana is known for.
Walk-Wade Fishing
When fishing the wade section, we prefer to park at Reynolds Pass or 3-Dollar Bridge (named for the historic $3 parking fee that is now voluntary, we used to call it Pay Bridge). From there, we like to take our time walking the river, investigating all the pocket water along the way rather than floating from one spot to the next. Pay particularly close attention to the water right along the bank. We have a saying for this section: “If you are standing in the water, you're standing on the fish.” With all that said, our kit for wading the Upper Madison begins with a backpack to carry snacks, beverages, sunscreen, and rain gear; if you’re walk-wading, you’ll likely be putting in some miles. Our advice? Come prepared.
Our gear list also includes a trusty 5wt fly rod for nymphing and dries (when the opportunity arises). That said, many of our friends prefer a 6wt for a little extra “beef” when stripping streamers. Make sure you have a good supply of 5X mono and fluoro, fly floatant, strike indicators, and some nontoxic split shots.
There’s a lot of good fly shops in the area, so don’t forget to drop in and get the local update on what the fish are biting. Our fly boxes will typically have a mix of Shop Vacs, Prince Nymphs, Pheasant Tails, Serendipities, and Copper Johns for nymphing. Dries will include Parachute Adams, Elk Hair Caddis, Griffiths Gnats, Yellow Sallys, hoppers, and salmon flies, though these depend on the time of the year.Float Fishing
As mentioned above, you can float the wade-only section, but you’ll need to get out and wade whenever you want to fish. This will make it difficult to do justice to all of the superb pocket water in this stretch of river. If you want to float, consider putting in at Lyons Bridge or somewhere downstream. You’ll want most of the same flies used in the wade section, but keep in mind that fishing from a boat gives you more opportunities to extend your drift over primo water. We like to take advantage of this when fishing large dries like hoppers and salmon flies. You can also bring some large stonefly patterns in the boat to throw at the bank and extend that drift as much as possible.
Adventure on the Madison
The Madison River offers big trout, technical water, and breathtaking Big Sky scenery. Living up to its distinction as a world-class fly fishing destination, there is no shortage of adventure to be found here. If you have an extra day in the area for exploring farther afield, remember to pack some hiking boots. The Tobacco Root Mountains, Lee Metcalf Wilderness Area, Madison Range, Gravelly Range, and (of course) Yellowstone National Park are all within a stone’s throw and offer plenty of hiking, small stream fishing, gorgeous views, and solitude. Want an evening of relaxation? Remember your swim suit and consider visiting Norris Hot Springs or attending a Vaudeville show in the historic mining town of Virginia City. We hope this brief guide helps you prepare for your trip to the Upper Madison. Have fun out there!
Thoughts? Questions? Stories from the Upper Madison? Leave them in the comments below!
Our Kit Series: Fly Fishing the Upper Madison
-
Fly Fishing Adventure in the High Country
Nothing says summer like hiking to a high mountain lake with your fly rod strapped to your backpack! From day hikes to backpacking trips, there’s endless opportunity for adventuring in the rugged peaks, cool breezes, and solitude of the high country. We spend a lot of time exploring mountain lakes during the summer and they’ve long been one of our favorite places to fly fish.
Backpacking with the fly rod.While some mountain lakes are more remote than others, hiking into any of these gorgeous locations means you’ll need to be extra prepared. Here’s what we like to have with us for a fun and successful day in the mountains.
Don’t forget your basic outdoor gear:
There are a few essentials that everyone should carry with them, regardless of why they’re hiking in the backcountry. In your backpack, you’ll want to make sure you have a first aid kit, a lighter, a water filter and water, headlamp, sun protection (sun glasses, sunscreen, AND cap), a navigational aid (GPS and/or physical map), a pocket knife/Leatherman, plenty of food, and extra layers. If you’re backpacking, you’ll want some sort of bivy sack or tent to ward off the elements… And even if you’re not backpacking, having some sort of quick and easy shelter on hand is never a bad idea.
Example gear for a longer backpacking trip.We also highly recommend bringing bear spray, especially when hiking in Montana, Idaho, or Wyoming. Take a moment to familiarize yourself with the wildlife in the area and review best practices for wildlife encounters.
Fly fishing gear to have on hand:
Waders. Yes, waders. More often than not, even though it's a hot day, the water temps in high mountain lakes will freeze you to the bone in no time at all without them. And if you’re bringing waders, wading shoes are also an essential to keep your waders hole-free. To keep things light, we like to bring sandals or an old pair of light-weight running sneakers.
Warm clothes. We already mentioned layers above, but it’s worth restating: warm clothes are a must. Unpredictable weather aside, being in the water for long periods of time (even on a perfectly sunny day) will require a good coat and even some long underwear beneath your waders.
Fly rod. You’ll want a 4-piece rod for ease of carrying in your backpack. We like the Craig Fly Rod for these trips because it's light and tough. You’ll also want a light, strong and dependable fly reel like our Lite 406 Reel. You don’t want to hike into a mountain lake just to find out your fly reel is not functioning properly, so make sure you have good gear!
Getting the Craig Fly Rod ready for some backcountry fishing.Tippet and leaders. We like a 7.5 ft 5X leader with 5X or 6X tippet, depending on the size of fish you expect to be catching.
Flies. This will obviously vary based on the type of fly fishing you’re hoping to do. For dries, Parachute Adams, Madam X, and Royal Trude will generally get the job done. For nymphs, Lighting Bugs, Copper Johns, Scuds, Pheasant Tails, and Hot Head bead flies will keep you jumping. Bring some smaller streamers along as well (like Wooly Buggers).
The miscellaneous. Fly floatant, non-toxic sinkers, and a small fly box or fly puck should all be in your kit. If you're packing a float tube and fins along, you might want to bring a sinking line or a detachable sink tip. Getting a streamer down deep and paddling backward slowly is a great technique for larger fish.
Now there’s just one thing left to do: pack up your gear and hit the trails. Those high-country cutthroat and grayling are calling! (Psst… Send us pictures and stories of your adventures; we'd love to see them!)
Have a question? Been to some mountain lakes recently? Tell us about it in the comments below!
Our Kit Series: Fly Fishing Mountain Lakes
-
The Madison River begins at the confluence of the Gibbon and Firehole Rivers in Yellowstone and flows through approximately 183 miles of mountain-framed vistas before arriving at Three Forks—a meeting of the Jefferson, Gallatin, and Madison Rivers that marks the headwaters of the Missouri River.
The Upper Madison, stretching from Quake Lake to Ennis, is open to fishing year-round. A smaller section from Reynolds Pass Bridge to Lyons Bridge is wade-only fishing; you can float this section, but you can’t fish from the boat. Whether wading or floating, the Upper Madison offers boundless opportunities for wrangling large trout and taking in the rugged beauty that western Montana is known for.
Walk-Wade Fishing
When fishing the wade section, we prefer to park at Reynolds Pass or 3-Dollar Bridge (named for the historic $3 parking fee that is now voluntary, we used to call it Pay Bridge). From there, we like to take our time walking the river, investigating all the pocket water along the way rather than floating from one spot to the next. Pay particularly close attention to the water right along the bank. We have a saying for this section: “If you are standing in the water, you're standing on the fish.” With all that said, our kit for wading the Upper Madison begins with a backpack to carry snacks, beverages, sunscreen, and rain gear; if you’re walk-wading, you’ll likely be putting in some miles. Our advice? Come prepared.
Our gear list also includes a trusty 5wt fly rod for nymphing and dries (when the opportunity arises). That said, many of our friends prefer a 6wt for a little extra “beef” when stripping streamers. Make sure you have a good supply of 5X mono and fluoro, fly floatant, strike indicators, and some nontoxic split shots.
There’s a lot of good fly shops in the area, so don’t forget to drop in and get the local update on what the fish are biting. Our fly boxes will typically have a mix of Shop Vacs, Prince Nymphs, Pheasant Tails, Serendipities, and Copper Johns for nymphing. Dries will include Parachute Adams, Elk Hair Caddis, Griffiths Gnats, Yellow Sallys, hoppers, and salmon flies, though these depend on the time of the year.Float Fishing
As mentioned above, you can float the wade-only section, but you’ll need to get out and wade whenever you want to fish. This will make it difficult to do justice to all of the superb pocket water in this stretch of river. If you want to float, consider putting in at Lyons Bridge or somewhere downstream. You’ll want most of the same flies used in the wade section, but keep in mind that fishing from a boat gives you more opportunities to extend your drift over primo water. We like to take advantage of this when fishing large dries like hoppers and salmon flies. You can also bring some large stonefly patterns in the boat to throw at the bank and extend that drift as much as possible.
Adventure on the Madison
The Madison River offers big trout, technical water, and breathtaking Big Sky scenery. Living up to its distinction as a world-class fly fishing destination, there is no shortage of adventure to be found here. If you have an extra day in the area for exploring farther afield, remember to pack some hiking boots. The Tobacco Root Mountains, Lee Metcalf Wilderness Area, Madison Range, Gravelly Range, and (of course) Yellowstone National Park are all within a stone’s throw and offer plenty of hiking, small stream fishing, gorgeous views, and solitude. Want an evening of relaxation? Remember your swim suit and consider visiting Norris Hot Springs or attending a Vaudeville show in the historic mining town of Virginia City. We hope this brief guide helps you prepare for your trip to the Upper Madison. Have fun out there!
Thoughts? Questions? Stories from the Upper Madison? Leave them in the comments below!
Our Kit Series: Fly Fishing the Upper Madison
-
Caring for your Fly Rod
If you’re new to fly fishing, there’s a lot to learn: casting, knots, reading the water, setting the hook… But caring for your new equipment is just as important if you want to have it around for years. Here are a few tips to keep in mind when you’re handling your rod both on and off the river:
If there are willows along the riverbank, they can help you keep your gear safely off the ground.Cleaning Your Fly Rod (and Other Gear!)
After getting home from a weekend of fly fishing, cleaning your gear might (understandably) be the last thing on your mind. But a fly rod is an investment—one that’s meant to last a lifetime, assuming you take proper care of it.
Cleaning your rod can be as simple as running some fresh water over it after a day of hard fishing. Take a moment to look the ferrules over, removing any sand, dirt, or mud that might’ve gotten trapped inside. You can keep the threads of your reel seat clean and free of debris by wiping it with a soft cloth. All told, this process adds a few extra minutes to the end of the day—and the longevity of your fly rod is well worth it.
Keep in mind that cleaning your rod becomes extra important after fishing in a saltwater environment. Without proper washing and maintenance, saltwater will lead to corrosion (and ultimately the breakdown) of your fly rod and other gear.
It’s also a good idea to wax your fly rod a few times each season, especially before storing it for a long period of time. We like to use Riley’s Rod Wax or Pledge; just make sure you don’t get any wax on the male ends of the ferrules. Waxing your fly rod will increase your casting distance and make your rod look new again!
Rookie Moves to Avoid
Rookie move #1: Laying your rod on the ground. Always find a place to prop it up or ask someone to hold it. People, dogs, horses, etc., are used to walking on sticks. They are not used to walking around with fly rods lying on the ground.
Rookie move #2: Propping your fly rod upright next to any door—house and car doors are a fly rod's Grim Reaper! If you are around a vehicle, just lift the windshield wiper and set your rod on the windshield while holding it in place with the wiper.
Rookie Move #3: Putting your fly rod in the bed of a truck and slamming the tailgate on it or letting the rod get into the tailgate joint where it closes against the body of the truck. Be careful around tailgates. Yes. We’ve all driven down a dirt road with a fly rod in the bed of the truck leaning out over the top of the tailgate, but do it properly—don’t be a Rookie!
Rookie Move #4: Holding your rod anywhere other than the handle. Fly Rods are designed to have a full flex from the handle to the tip. If you hold the rod somewhere along the body while lifting a fish for a picture, for instance, there’s potential for the rod to flex in ways it’s not supposed to. That flexion can leave it vulnerable to snapping above the point where you’re holding the rod.
Ferrules
When assembling the rod, it's vital to ensure the alignment dots are correctly matched before firmly pushing the pieces together. If you push the pieces together tightly and then twist to align the dots, you risk damaging the rod. Fly rods are designed to flex up and down—not for twisting pressure.
Loose ferrules are another cause of broken rods. If they are not fitted snuggly together, the flexion of the rod is again disrupted, placing undue stress on that connection point. Loose ferrules are generally caused by not being tightened down effectively, though dirt and grime could also be preventing the ferrule from fitting together properly. As mentioned above, avoid waxing the ferrules—this will cause the ferrule to slide apart when casting.
If you ever find yourself struggling to pull the ferrules apart, there’s a few simple steps you can take. Get the ferrule as cold as you can. Wrapping it in an ice-filled towel or zip-lock bag often does the trick. Once it’s nice and cool, try to pull the sections straight apart. We recommend using rubber gloves or something with a similarly grippy surface. This will help prevent your hands from sliding and damaging guides. Using two people can also be helpful, but be sure to keep the rod straight to avoid damaging it. Whatever method you decide to use, always avoid excessive force!
And lastly, don't forget, we have a Father's Day Sale running right now through June 16th: 25% Off All Fly Rods!
Questions? Comments? Tales of your own rookie fly fishing mistakes? Tell us about them in the comments section below!
Caring for Your Fly Fishing Rod
-
Fly Fishing in Four Seasons
The Missouri is open to fishing year-round in Montana, so you have four very distinct seasons to enjoy. We tend to frequent the section of water north of Holter Lake Dam and south of Hardy Bridge. That said, there’s plenty of great fishing elsewhere along its length.
This article will dive into what we like to have on hand for fishing north of Holter Lake. Regardless of the exact location you choose to go fishing, however, fly fishing the Mighty Mo will requires a season-specific bag of tricks.
Spring Fly Fishing
Early spring generally means low flows and cold-water temperatures… And that makes for sluggish fish in deep-holding water. Because they’ll be holding in slow water, they’ll also have plenty of opportunity to look over your presentation. Good quality fluorocarbon like Montana Casting Co. Conceal or Emerger tippet is essential.
Your fly box will need flies that get down into the deep water quickly. Perdigon patterns with a tungsten bead head will sink fast and are a must-have on the Mo. You’ll also want an arsenal of bright-orange or hot-pink, bead-head flies (Hot Heads), as well as scud or sowbug patterns. Adjust your strike indicator to get the correct depth, and use some non-lead split shots to help get those flies down fast.
Fly fishing the Montana's Missouri River in spring.In late spring, we finally start to see glimpses of summer, but don’t be fooled; winter can (and will) rear its head at the drop of a hat. We often say that if you don’t like the weather in Montana, wait five minutes—it will change. This is especially true in the spring, so plan accordingly.
In between the occasional sleet-storm, warm, sunny days will start to increase water temperatures and runoff from snow melt. The runoff, in turn, further increases the water temperature, and the sleeping river comes to life. Aquatic insects will start to move, emerge, and hatch—mostly midges, mayflies, and baetis, so you’ll want to have some small black to dark olive dries on hand. Nymphing will still be the mainstay using Perdigons, Hot Heads, and scud or sowbug patterns. That said, don’t be afraid to try a Juju Baetis and similar patterns. The fish will be much more active, looking for food throughout the river.
Summer Fly Fishing
Hot days mean caddis and epic Trico (callibaetis) hatches, followed by a cold drink and dinner at Izaak’s restaurant in Craig. This time of the year, bring plenty of sunscreen and fly floatant (but remember that sunscreen should not go on your line).
The Montana Casting Co. family on a summer fishing trip.During the heat of the day, use terrestrials: ants, hoppers, and beetles. Sinking a hopper just barely under the surface while running it through a fast, foot-deep riffle is often too tempting for a trout to pass up. That said, the real magic is worked with Tricos and caddis in the mornings and evenings—it’s a fish-wrangling marathon. Make sure to have plenty of sowbugs, scuds, jujus, and frenchies on hand as well. Summer is a great time to try out different techniques—you’ll likely find success with almost all of them.
Fall Fly Fishing
Days get shorter, the water starts to cool, and the browns start to move towards spawning grounds. Fall is still a great time to fish dries and nymph rigs, but the real star of the show is the streamer! There are many exotic streamer patterns to choose from—Mini-Dungeon, Balanced Leeches, and Wolley Buggers, to name a few. Make sure you have a good selection of Parachute Adams and callibaetis on hand in case you happen to hit a warm day with a good hatch coming off. If you’re nymphing, keep throwing the sowbug and scud patterns and try some worm patterns and a Copper Johns or a Pheasant Tail.
Fly fishing Montana's Missouri River in early fall.Similar to spring, the Montana fall tends to vary widely in terms of weather. You might be fishing the 80-degree remnants of summer or squinting into the wind of winter’s first snowy spat. Layers and sun protection are a must!
Winter Fly Fishing
Once again, cold water temps mean sluggish fish in deep water. This time of the year, you’ll want primarily small wet flies for nymphing: scuds, Pill Poppers, sowbugs, and Zebra Midges. This time of the year, I like to allow my flies (along with some no lead split) to tap across the bottom of the river during the casting drift.
If you manage to time it right and hit a 40-degree day in December or January, don’t be afraid to take a short float. Bring a Jetboil for ramen and hot toddies and a Mister Heater for warmth. Heated socks and a good warm coat are also highly recommended!
Our kit for the Upper Missouri:
- A 4 or 5 wt Montana Casting Co. fly rod for spring and summer AND a 6wt in the fall for streamers
- The Lite or Elite Reel with the Dearborn fly rod OR Envy or Elite Reel with the Warm Springs fly rod OR the Lite or Envy Reel with the Craig fly rod
- MC-40 Fly Line for dries OR MC-30 fly line for nymphs OR MC-38 fly line for streamers
- 7.5 ft 5X leader for nymphs and streamers or 9 ft 5 OR 6X leader for dries
- Conceal tippet for nymphs and streamers OR emerger tippet for dries
- Micro swivels, non-lead split and some indicators for nymphing
- Sunscreen
- Warm layers (especially for fall, winter, and spring)
- Flotant
- Seasonal fly box
- Spring: Perdigons, Hot Heads, scuds, sowbugs, black or olive dries, Juju Baetis
- Summer: Flotant, Tricos, Caddis, terrestrials, sowbugs, scuds, jujus, and frenchies.
- Fall: Streamers, Parachute Adams, callibaetis, Pheasant Tail, scuds, sowbugs, and worms
- Winter: Scuds, Pill Poppers, sowbugs, and Zebra Midges
As ever, we encourage you to drop in at the local fly shops wherever you visit—they’ll have the most up-to-date information on what’s getting the fish to bite and they’re also a great resource for stocking up on any last-minute supplies. Happy fishing!
Don’t forget to leave your thoughts, questions, and fishing stories in the comments below!
Our Kit Series: Montana's Upper Missouri River
Comments