![Fly Fish Much? What to do if you “Get Hooked Up”](http://montanacastingco.com/cdn/shop/articles/IMG_6148_1-468322.jpg?v=1702597014)
Fly Fish Much? What to do if you “Get Hooked Up”
By: Montana Casting Co.
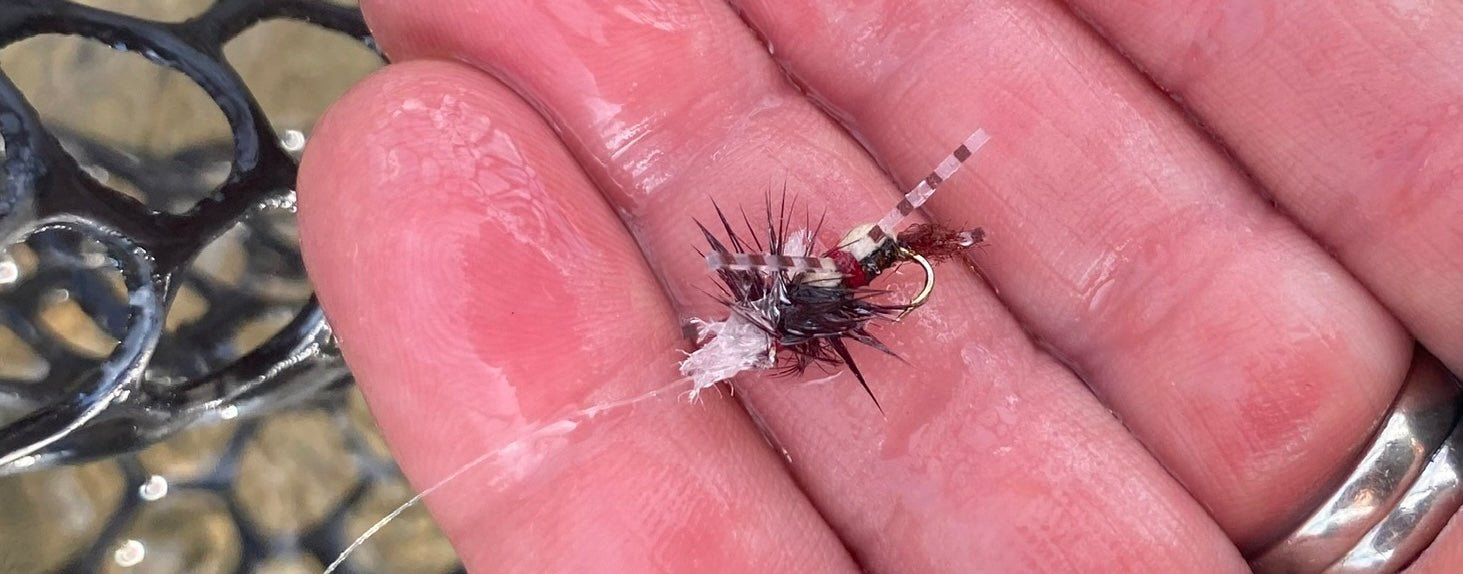
If you spend much time around sharp objects, sooner or later, you’re bound to experience a mishap. And it probably won’t surprise you that a sharp hook attached to a nearly invisible tippet is just as well suited for catching fingers as it is fish. While the temptation may be to just yank it out, there’s a better way!
Start by making a loop out of 2x or 3x that you can use to firmly pull, then slip it around the fly so you have a loop down where the bend of the hook is. Press the eye of the hook against the skin to move the hook in a way that disengages the barb inside the finger. Keeping pressure on the eye of the hook to make sure the barb stays disengaged, give the 2x loop a firm, quick pull, and out it comes.
Recommended Reading
-
What’s a nail knot and when is it used?
Many modern fly lines are designed with welded loops, allowing for leader to be attached quickly loop-to-loop. Prior to the invention of welded loop fly lines, however, nail knots were commonly used to attach a butt section of monofilament to the fly line. The leader would then be tied to the butt section, rather than directly to the fly line to extend the life of the fly line.
Loop-to-loop is certainly simpler, but some fly fishermen still prefer using a nail knot and a butt section. In our opinion, this method better transfers the energy from the fly line to the fly by turning the leader over more efficiently.
Tying a nail knot:
A nail knot is one of the more complicated knots to tie. For this reason, we always use a Tie-Fast Tool—an ingenious tool that makes tying a nail knot simple. Here’s how to use it:
- Place your butt section in the notch of the tool, leaving about 6 inches sticking out of the front (or tip) of the tool.
- Hold the butt section in place with your thumb. Wrap the end of the butt section around the tip of the Tie-Fast, working up the tool toward your thumb.
- After 6 or 7 wraps, run the tag end of the butt section through the coils and back out the tip of the tool.
- Continue to pinch everything in place and run the end of your fly line from the tip of the tool, through the coils, and back to your thumb. Pinch the fly line along with the butt section against the tool.
- With a quick pull of the short end of the butt section, the coils will jump off of the tool and wrap around the fly line.
- Adjust the coils to be straight before pulling both ends of the butt section to cinch the knot down.
- Trim the tag ends of the fly line and butt section.
- Blood knot your leader to the butt section… and go fishing!
Need a visual? Follow along in the video below as Montana Casting Company founder and rod-building wizard Scott Joyner walks through the steps of tying a nail knot. Happy fishing!
Fly Fishing Knots: How to Tie a Nail Knot
-
Fly Fishing Adventure in the High Country
Nothing says summer like hiking to a high mountain lake with your fly rod strapped to your backpack! From day hikes to backpacking trips, there’s endless opportunity for adventuring in the rugged peaks, cool breezes, and solitude of the high country. We spend a lot of time exploring mountain lakes during the summer and they’ve long been one of our favorite places to fly fish.
Backpacking with the fly rod.While some mountain lakes are more remote than others, hiking into any of these gorgeous locations means you’ll need to be extra prepared. Here’s what we like to have with us for a fun and successful day in the mountains.
Don’t forget your basic outdoor gear:
There are a few essentials that everyone should carry with them, regardless of why they’re hiking in the backcountry. In your backpack, you’ll want to make sure you have a first aid kit, a lighter, a water filter and water, headlamp, sun protection (sun glasses, sunscreen, AND cap), a navigational aid (GPS and/or physical map), a pocket knife/Leatherman, plenty of food, and extra layers. If you’re backpacking, you’ll want some sort of bivy sack or tent to ward off the elements… And even if you’re not backpacking, having some sort of quick and easy shelter on hand is never a bad idea.
Example gear for a longer backpacking trip.We also highly recommend bringing bear spray, especially when hiking in Montana, Idaho, or Wyoming. Take a moment to familiarize yourself with the wildlife in the area and review best practices for wildlife encounters.
Fly fishing gear to have on hand:
Waders. Yes, waders. More often than not, even though it's a hot day, the water temps in high mountain lakes will freeze you to the bone in no time at all without them. And if you’re bringing waders, wading shoes are also an essential to keep your waders hole-free. To keep things light, we like to bring sandals or an old pair of light-weight running sneakers.
Warm clothes. We already mentioned layers above, but it’s worth restating: warm clothes are a must. Unpredictable weather aside, being in the water for long periods of time (even on a perfectly sunny day) will require a good coat and even some long underwear beneath your waders.
Fly rod. You’ll want a 4-piece rod for ease of carrying in your backpack. We like the Craig Fly Rod for these trips because it's light and tough. You’ll also want a light, strong and dependable fly reel like our Lite 406 Reel. You don’t want to hike into a mountain lake just to find out your fly reel is not functioning properly, so make sure you have good gear!
Getting the Craig Fly Rod ready for some backcountry fishing.Tippet and leaders. We like a 7.5 ft 5X leader with 5X or 6X tippet, depending on the size of fish you expect to be catching.
Flies. This will obviously vary based on the type of fly fishing you’re hoping to do. For dries, Parachute Adams, Madam X, and Royal Trude will generally get the job done. For nymphs, Lighting Bugs, Copper Johns, Scuds, Pheasant Tails, and Hot Head bead flies will keep you jumping. Bring some smaller streamers along as well (like Wooly Buggers).
The miscellaneous. Fly floatant, non-toxic sinkers, and a small fly box or fly puck should all be in your kit. If you're packing a float tube and fins along, you might want to bring a sinking line or a detachable sink tip. Getting a streamer down deep and paddling backward slowly is a great technique for larger fish.
Now there’s just one thing left to do: pack up your gear and hit the trails. Those high-country cutthroat and grayling are calling! (Psst… Send us pictures and stories of your adventures; we'd love to see them!)
Have a question? Been to some mountain lakes recently? Tell us about it in the comments below!
Our Kit Series: Fly Fishing Mountain Lakes
-
NOTE: If you're looking for the "Our Kit Series" blog, please click here: Fly Fishing Mountain Lakes. Otherwise, read on to learn about the two different Surgeon's knots:
Not the Same Knot
While both of these common fly fishing knots utilize the same basic principle, there are slight variations in how they are tied and what they are used for. We’ve broken both down below into a simple step-by-step how-to.
When to Use a Surgeon’s Loop
This simple knot is used to create a strong loop in the end of your leader or tippet to allow for loop-to-loop connection between tippet and leader or leader and the welded loop of your fly line. Read on for step-by-step instructions!
Tying a Surgeon’s Loop
- Double the end of your leader or tippet over on itself.
- Make a loop with the doubled line.
- Draw the end of the doubled line through the loop twice.
- Wet the knot and cinch it down.
When to Use a Double Overhand Surgeon’s Knot
This is one of the most commonly used knots in fly fishing. Simple and strong, this is an efficient way to attach tippet to leader and tippet to tippet. It’s also great for fishing with a dropper; you can leave a tag end and tie on a fly for a more natural presentation. Though there are other knots that allow you to achieve similar results, the simplicity and speed with which a double-overhand surgeon’s knot can be tied makes it a fly fishing mainstay. Read on for step-by-step instructions and a helpful how-to video!
Tying a Double Overhand Surgeon’s Knot
- Place the two ends of tippet (or leader and tippet) side-by-side, pointing in opposite directions.
- Make a large overhand loop in the center of the overlapping ends.
- Now, simply pull one side of the tippet ends through the loop twice.
- Wet the knot with some spit or water and cinch it down.
- Trim off the tag ends or leave one long to tie on a dropper.
Drop your questions or requests for future instructional blogs in the comments below. Happy fishing!
Fly Fishing Knots: Surgeon’s Loop and Double Overhand Surgeon’s Knot
-
The Madison River begins at the confluence of the Gibbon and Firehole Rivers in Yellowstone and flows through approximately 183 miles of mountain-framed vistas before arriving at Three Forks—a meeting of the Jefferson, Gallatin, and Madison Rivers that marks the headwaters of the Missouri River.
The Upper Madison, stretching from Quake Lake to Ennis, is open to fishing year-round. A smaller section from Reynolds Pass Bridge to Lyons Bridge is wade-only fishing; you can float this section, but you can’t fish from the boat. Whether wading or floating, the Upper Madison offers boundless opportunities for wrangling large trout and taking in the rugged beauty that western Montana is known for.
Walk-Wade Fishing
When fishing the wade section, we prefer to park at Reynolds Pass or 3-Dollar Bridge (named for the historic $3 parking fee that is now voluntary, we used to call it Pay Bridge). From there, we like to take our time walking the river, investigating all the pocket water along the way rather than floating from one spot to the next. Pay particularly close attention to the water right along the bank. We have a saying for this section: “If you are standing in the water, you're standing on the fish.” With all that said, our kit for wading the Upper Madison begins with a backpack to carry snacks, beverages, sunscreen, and rain gear; if you’re walk-wading, you’ll likely be putting in some miles. Our advice? Come prepared.
Our gear list also includes a trusty 5wt fly rod for nymphing and dries (when the opportunity arises). That said, many of our friends prefer a 6wt for a little extra “beef” when stripping streamers. Make sure you have a good supply of 5X mono and fluoro, fly floatant, strike indicators, and some nontoxic split shots.
There’s a lot of good fly shops in the area, so don’t forget to drop in and get the local update on what the fish are biting. Our fly boxes will typically have a mix of Shop Vacs, Prince Nymphs, Pheasant Tails, Serendipities, and Copper Johns for nymphing. Dries will include Parachute Adams, Elk Hair Caddis, Griffiths Gnats, Yellow Sallys, hoppers, and salmon flies, though these depend on the time of the year.Float Fishing
As mentioned above, you can float the wade-only section, but you’ll need to get out and wade whenever you want to fish. This will make it difficult to do justice to all of the superb pocket water in this stretch of river. If you want to float, consider putting in at Lyons Bridge or somewhere downstream. You’ll want most of the same flies used in the wade section, but keep in mind that fishing from a boat gives you more opportunities to extend your drift over primo water. We like to take advantage of this when fishing large dries like hoppers and salmon flies. You can also bring some large stonefly patterns in the boat to throw at the bank and extend that drift as much as possible.
Adventure on the Madison
The Madison River offers big trout, technical water, and breathtaking Big Sky scenery. Living up to its distinction as a world-class fly fishing destination, there is no shortage of adventure to be found here. If you have an extra day in the area for exploring farther afield, remember to pack some hiking boots. The Tobacco Root Mountains, Lee Metcalf Wilderness Area, Madison Range, Gravelly Range, and (of course) Yellowstone National Park are all within a stone’s throw and offer plenty of hiking, small stream fishing, gorgeous views, and solitude. Want an evening of relaxation? Remember your swim suit and consider visiting Norris Hot Springs or attending a Vaudeville show in the historic mining town of Virginia City. We hope this brief guide helps you prepare for your trip to the Upper Madison. Have fun out there!
Thoughts? Questions? Stories from the Upper Madison? Leave them in the comments below!
Our Kit Series: Fly Fishing the Upper Madison
Comments